


Share!
How To Use An Audio Compressor
If you’re wondering how to use an audio compressor, you don't need to be using a specific plugin to understand what I'm talking about. Stick around, you’ll be learning what everything does in a compressor and a limiter. This tutorial will walk you through what all of the controls (parameters) will do and some of the different types of compression techniques at the end.
What Is An Audio Compressor / Why Use It?
Simply put, what a compressor does is it reduces the gain of something based on how loud it is when it goes through the effect. Limiters and compressors will, however, reduce the dynamic range of your sounds that you use it on. So, be careful not to over-compress, it can leave you with results similar to having all of your mixer tracks set to the same level. That can really ruin a good mix.
The Reason why you would use a compressor will vary, depending on what unique uses you come up with. A common use of this effect is to bring harsh and soft elements closer together in their perceived loudness so a sound is more “full”. This allows you to keep all of the elements that make up a sound at a similar dB level without causing anything to peak over 0dB and without having extreme differences between each.
If you would rather watch the video than reading, you can watch the video here, which includes examples of what each parameter does to a sound.
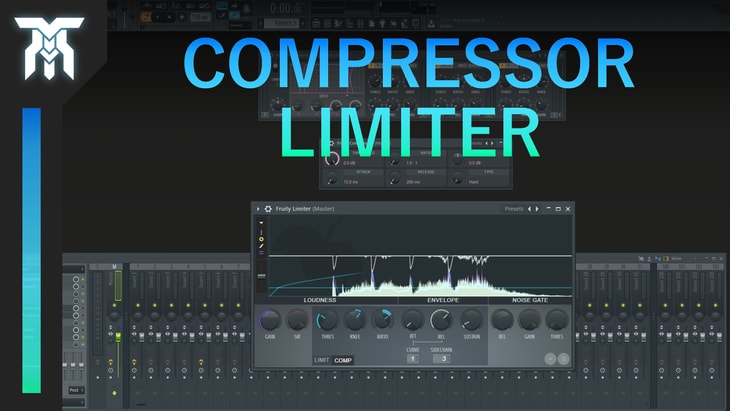
Limiter & Compressor Parameters
Compressor
Gain: The gain control will allow you to apply post-compression gain. This is also known as makeup gain and in the case of this particular plugin, while on the limiter section, this parameter will apply the gain before the signal is limited.
Saturation: The Saturation on a limiter acts as a threshold that will apply amplitude distortion to anything within its range.
Threshold: The threshold parameter will set how loud the input can be before being compressed. Everything louder than the level of the threshold will be affected by the compressor. This is good for getting rid of harsh or louder elements of a track that kind of stand out and may sound unpleasant. Lowering the threshold to only affect these peaks will keep your levels in check.
Knee: This is a term used to describe the compression rate. This is quite similar to the attack but is slightly different.
Ratio: The ratio determines the amount of gain reduction applied once a sound is louder than the set threshold. The numbers in the ratio describe how much gain will be reduced based on the input level. For example, if the ratio is set to 4:1, you will need to increase the amplitude of the sound by 4 decibels to hear an increase of 1 decibel. When the ratio is at 1:1, there will be no compression, simply because you need to increase the level by 1 decibel to get a result of 1 decibel.
Attack: The attack amount will determine how fast the compressor will react to changes in the decibel level of the input. To compress the signal right away, you can use a low attack time. When using a higher attack time, on the other hand, you can let the transient (or the beginning of a sound) pass through unaffected and the compressor will take longer to reach it's set ratio of gain reduction.
Curve: The curve setting connected to the attack and release times ranges from 1 to 8. Using this will let you change the tension of the curve associated with attack and release. At 1 the effect will be more immediate and at 8 the curve will be longer.
Release: This affects the gain of the input signal after it has fallen below the threshold level again. Changing this value will set the time it will take for the gain to increase until it becomes uncompressed again. Lowering the release time will return the signal to its original decibel level very rapidly while choosing a higher amount will make the amplitude rate slower.
Sustain: The Sustain control is used to prevent the compression envelope from releasing too quickly.
Limiter
Ceiling: The ceiling on a limiter determines where this maximum is and the input signal needs to be higher than the ceiling level for the limiter to work.
Types of Audio Compression
Limiting
What makes a compressor a limiter is when the ratio of compression is generally at 10:1 or higher. A limiter will quite literally limit the maximum decibel level an element can reach. This ensures nothing peaks beyond a certain point and is used to prevent clipping.
By setting the ceiling at a certain level, the signal you send through the limiter will not go above its set dB level. This creates a hard-stop, allowing you to boost quieter elements without having to worry about anything peaking.
Sidechain Compression (Ducking)
Essentially, Side-chaining something is when you compress one sound while another plays to increase its impact, create rhythm, and add movement to your sound. This makes one element sound quieter while the other sound louder, without having to increase gain - by lowering one signal level, then returning it to normal once the other signal has stopped.
Sidechain compression can be done many different ways & is largely impacted by the DAW you use. Some approaches can be made by automating the wet value of a compressor with a low threshold and a high ratio. Another could be automating the dB level on a mixer track - Which technically wouldn’t be compression. True side-chain compression is applied to one signal based on whenever another signal is played.
Multi-band Compression
Sending a signal through a multiband compressor will split the signal into 2 or more band-pass filters and will give you control over where these bands are in the sound and their curve - kind of like an EQ. A typical Multi-band compression effect will have 3 bands.
Using a Multi-band Compressor allows you to compress multiple regions on the frequency spectrum independently from one another. The low-end, mid-section, and high-end can all be manipulated separately without affecting other bands of compression.
Parallel Compression
Parallel Compression is a technique used to apply compression to a sound while keeping the original sound uncompressed at the same time. The main use of this is to keep the intensity of louder elements such as transients (leaving them un-touched) while boosting the level of softer elements. This is done by routing a signal to additional mixer tracks (one or more) and applying compression there instead of on the original track.
If you want to really dive deep into the different types of compression, this article on parallel compression by sound on sound does a really good job at explaining this concept in detail.
You may not always need to use a compressor or limiter on your tracks and how to use a compressor is up to you. If you do use it, I hope this tutorial will help you get the results you're after. If you liked it, you might be interested in the other tutorials on how to use audio effects. Thanks for reading!
Featured Post

Share!
Join the newsletter for free stuff and some knowledge too!
Everything you need. No Spam. A heads up before others do.


