Updated: Aug 02, 2019
Share!
How To Use A Delay Effect Plugin
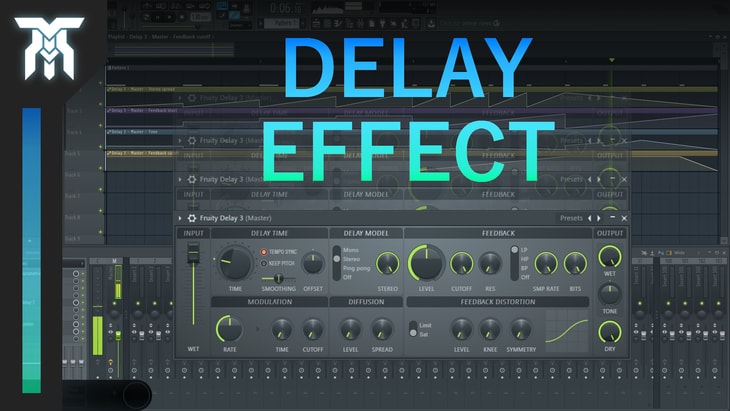
If you want to know how to use a delay effect plugin and what everything does, stick around. This tutorial will teach you about the principles of delay, regardless of the plugin you choose.
From standalone plugins to delays that are built into synths, they will all have relatively the same options to change. Hopefully, this will give you a good understanding of what may be included in your effect.
What Is A Delay Effect & Why Use It?
Now, using delay with your music, sound effects and even your vocals can provide you with an alternative to using reverb depending on how you use it. It's not exactly the same, but what the effect will typically give your audio is an echo-like effect. When synced with the tempo of your project, you can really start to see the potential that this type of effect can reach, especially with the rhythm of music.
There are many different ways to use delay, some may be obvious and other can be unconventional and straight up creative. A common reason why you would want to use a delay effect is to make a sound repeat over time and improve the movement in the sound, keeping it from being monotonous.
If you would rather watch the video than reading, you can watch the video here, which includes examples of what each parameter does to a sound.
Delay Effect Parameters
Feedback: Depending on how long you want the sound to continue echoing, you can set the feedback level to control how fast the delays will fade away. It can fade quickly with a low amount of feedback and you can make a long-lasting echo with a high amount of feedback. Some can be set to never fade at all, going on indefinitely. All of this is done by setting how much of the delayed (or wet signal) is fed back into the dry signal.
Delay Mode: The way the effect handles the output signal can be determined through the delay mode. Different plugins come with different modes, some common types of delay are normal (or stereo), which gives the left and right channels independent delays. Mono, which sends the same delay signal to both (right and left) channels. And ping pong, playing the delayed signal on either the left or right channel by itself, switching back and forth for each echo.
Spread & Width: If you're using the ping pong mode, changing the spread of the signal will determine the panning intensity of each delay and whether or not the delay is purely bouncing from right and left, or sharing some output between the two on each delay.
This is very similar to the Width parameter, which changes the stereo width of the delay. This feature will probably replace your mono and stereo options since that's exactly what it changes. I'll show you with ping-pong turned on, it will basically turn it off if we have width set to zero, putting it in full mono, at 100% it will be at full stereo, or anywhere in between.
Diffusion/Smear: Making the delay more realistic or pronounced can be done by using diffusion (or smear) depending on what your plugin calls it. By blurring the signal, you can also get it to sound more like a reverb effect.
Delay Time: The time setting of the delay effect will control the time before the signal is delayed and how much time is between each delay. In some cases, you'll be able to sync the delay time with the tempo of the project you have open in the host or DAW. This is a good way to represent the space a sound is played in. Using a low time can help create a reverb-like effect.
Dry & Wet: The last part of the delay effect is the dry and wet value. This determines how much of the original sound will be mixed with the affected sound in regards to gain (or volume). A dry signal is the output of an instrument or synth, untouched by any effects. The wet signal determines how much of the effect is applied to the output. When 100% wet, the output of the signal will only be through the effect and will not include the dry signal at all.
Delay Effect Techniques
As mentioned before, you can use delay as an alternative to reverb. After all, delay is a form of reverb. By using a very short decay time, you can add a very subtle reverb-like tail on your sounds.
This article simply can’t do this tip justice. Use a delay time calculator to line up the delay intervals to the tempo of your music. Doing this will make it so each delay (or echo) can be set up to hit on every ¼, ⅛, etc.
Here's a conversion chart for values to sync up your delay time with the tempo.
If you’re after some glitchy electronic sounds with some rough edges, automate delay time at low levels with (or without) a high feedback level. If your plugin supports these parameters, you can also leave the delay time at an extremely low level with automation on the modulation time and feedback distortion level to get some aggressive madness.
Learn more about how to use effect plugins for sound design and composition.
Delay effects come in all shapes and sizes, and certainly, complexity. With what you've learned, you should be able to take on any delay plugin that you're put up against. Don’t forget to leave a comment below! Also, share it with someone (or lots of someones) if you found this taught you at least something about how to use a delay effect. Thanks for reading!
Featured Post
Share!
Join the newsletter for free stuff and some knowledge too!
Everything you need. No Spam. A heads up before others do.


