Updated: Aug 02, 2019


Share!
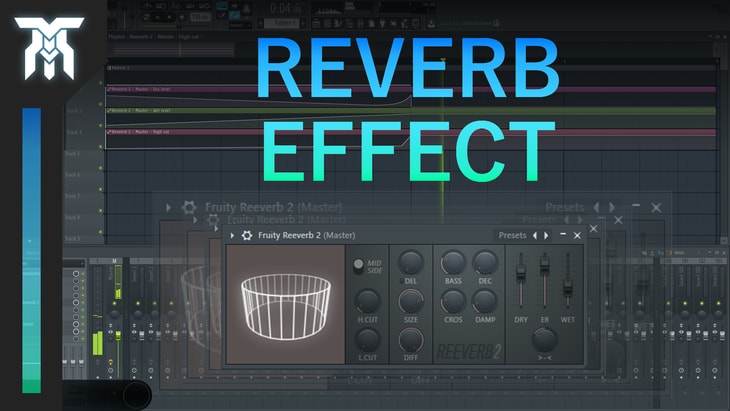
How To Use Reverb
Learning how to use reverb is an essential mixing technique. Now, it might be obvious what a reverb effect will do to a sound but if you're wondering what all of those parameters control and how they change the sound of the reverb, you'll want to read this post.
There are so many different reverb plugins out there. Some cost money and some are free. Whatever one you choose, they all generally revolve around the same parameters and principles.
What Is A Reverb Effect & Why Use It?
What a reverb does is it creates space, depth, position, you name it. It's all about making an environment around the sound you're trying to effect. You can make something sound like it's right in front of you, really far away, and even change how far away the walls or surrounding objects are from the source of audio.
Some reverb effects even come with a visualization of what the parameters are doing to the simulated room, it's a great way to learn what different levels will do to the sound. It's definitely not essential though.
The reason why you would use a reverb is to position elements in the mix to sound realistic, or simply to sound cool. Putting this kind of depth into various sounds can make the music, sound effect, or anything audio have more interest and immersion.
If you would rather watch the video than reading, you can watch the video here, which includes examples of what each parameter does to a sound.
Reverb Parameters
Size: The size of the reverb changes how big the simulated room will sound. You can make it sound like it’s being played in a closet, a hallway, and even a huge cathedral. Really, the possibilities are infinite. No, really! Some plugins allow you to make an infinite reverb.
Damping: The brightness of the reverb can be changed with high damping. This makes higher frequencies weaker, kind of like how it would be perceived in real life acoustic treatment. This determines how fast or slow the high end will decay. The higher you set the value, the more effective the attenuation will be.
Pre Delay: This determines the time it takes before you hear the initial reverb signal. Increasing this will create a larger gap from when the sound is played to when the effect is heard. In real-world acoustics, this can be compared to how far away the instrument is from a wall or object. If you want to make a realistic orchestra, you can position the instruments on stage using the pre-delay with subtlety. Some reverb plugins will also give you the ability to sync the delay time to the tempo of your project.
Diffusion: Changing the density of reflections can be done through the diffusion parameter. At a low setting, diffusion can provide a more distinct reverb. Using a higher setting will simulate reflections that are played back very close together.
Decay: Try not to get the decay confused with Pre Delay. The decay is what happens after, the Pre Delay is what happens before. This will give you control over how long the reverb tail (or release of the reverb) will go on for. Some effects allow you to make infinite reverb so be careful how much decay you use. Using a lot can destroy the dynamics of whatever you're making and can muddy the low end (basically just creating a wall of low frequencies).
Equalization: Many reverb effects come with some form of an EQ, usually in the form of cutoff points. High and low cuts are the most common form of equalization in reverb plugins. These will determine what frequencies the reverb will include in its output. Different sounds are affected differently by reverb, so these may or may not be used, depending on what needs to be accounted for.
Dry & Wet: Now, for the dry and wet controls. A dry signal is what the effect will process (which is just the raw signal from whatever instrument you're using). A wet signal is what the effect will produce (basically the sound will be sent through the reverb, and whatever comes out is the wet signal). Imagine playing an instrument in a room, and only hearing what bounces off everything around you. That's the wet signal. The dry signal is what you would hear directly from the instrument itself, without any sound bouncing back to you. To achieve a dry signal, you can either lower the wet all the way down or just turn off the effect, which would just bypass the plugin.
Reverb Techniques
Getting everything to fit together and sound uniform can be done if you use a reverb bus. By routing multiple sounds to a mixer track that is used solely for applying reverb, you can save yourself from adding a reverb to every element you want to have the same sounding space. This should be done with subtlety and doesn’t have to be applied to every instrument or sound effect for the mix to be glued together.
Reverb tails can muddy up a mix if too many reverbs are present at the same time. This is can be managed if you lower the decay time on sounds that aren’t followed by a silence. If what you’re going for is to have the reverb stretch out to fill empty space that may follow a sound, leave the decay time or adjust it to end when the silence does.
Another thing that can clutter a mix is when sounds in the low end (low frequencies) have reverb applied to them. Don’t apply to much reverb to low-frequency sounds (if any at all) and your mix should have more clarity.
It’s good to find ways to apply subtle reverb to help keep everything present and noticeable, not just a wall of reverb. A ton of reverb may sound cool, but it can ruin the dynamics. For sounds in the higher frequencies, you can use a high-pass filter before the reverb in the effect chain. This can make sure the low-end isn’t affected.
Rory Seydel at LANDR made some good points on reverb best practices if you’re interested in reading. It’s much the same as the techniques covered here but I do agree with a few of his pointers. - I even learned about high-passing prior to the effect, which I never really thought about doing since I dealt with it mostly in the reverb itself.
Besides that, you can also learn more about effect plugins here, on the blog.
That sums it up for most Reverb effects out there but there is definitely going to be some differences across all plugins. If you enjoyed the post, please share and leave a comment below, it would mean a lot. Thanks for reading!
Featured Post

Share!
Join the newsletter for free stuff and some knowledge too!
Everything you need. No Spam. A heads up before others do.


